Traditionally, when moving from one version to another of the old Dynamics NAV, one had to compare the standard code of their version with their modified code to know exactly what had been changed and modify it to achieve the same result in the new target version of Dynamics NAV.
This manual process of moving all the code greatly increased the long-term costs associated with the implementation of Dynamics NAV (especially with the refactoring that started with NAV2018). In addition to the costs of developments at the source, there was the process of changing developments from one version to another (e.g., from NAV 5 to any version of Dynamics NAV, forms had to be manually converted to pages, and layouts for reports).
This is where extensions come in. In Dynamics NAV, you could modify the program’s behavior at any point, and you could remove all the standard program behavior without any problem. With extensions, Microsoft has left points in the program’s code where you can make modifications. You still have the authority to change standard behaviors, extend functionalities, and create new functionalities, but only at the points in the processes where Microsoft allows you to.
For example:
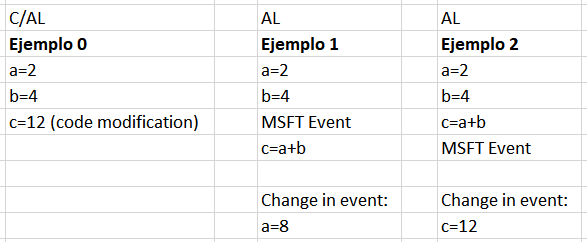
This new way of modifying the program means that you no longer have to compare all the code to move to the new version. Instead, you only need to review if the code in the new version fails and, only in that case, modify it. In most cases, around 99% of the code, except for significant Microsoft modifications, will not require any revision. (As an example, a typical development in Spain, such as the customer/vendor name in the portfolio, has not caused any problems in the last 4 years and has not required any changes despite the continuous updates in the cloud).
To make the change to extensions straightforward, you need to have everything migrated to the latest version with C/AL, Business Central 14, or “2019 Spring.” This is necessary because in this version, the option to export objects for a new syntax was added to automate much of the migration process.
1º Export objects from our BC14 database with the new syntax.
NAV Development Shell:

Export-NAVApplicationObject -DatabaseServer DBServer\SQLInstance -DatabaseName "MiBBDD" -ExportToNewSyntax -Path "c:\export2al\Modificados\modificadosbc14app-part1.txt" -Filter 'Id=1..129999' -ExportTxtSkipUnlicensed

Export-NAVApplicationObject -DatabaseServer DBServer\SQLInstance -DatabaseName "MiBBDD" -ExportToNewSyntax -Path "c:\export2al\Modificados\modificadosbc14app-part2.txt" -Filter 'Id=140000..1999999999' -ExportTxtSkipUnlicensed
2º Export objects from an unmodified BC14 database (the same CU as our database).
NAV Development Shell:

Export-NAVApplicationObject -DatabaseServer DBServer\SQLInstance -DatabaseName "CRONUS" -ExportToNewSyntax -Path "c:\export2al\Originales\originalesbc14app-part1.txt" -Filter 'Id=1..129999' -ExportTxtSkipUnlicensed

Export-NAVApplicationObject -DatabaseServer DBServer\SQLInstance -DatabaseName "CRONUS" -ExportToNewSyntax -Path "c:\export2al\Originales\originalesbc14app-part2.txt" -Filter 'Id=140000..1999999999' -ExportTxtSkipUnlicensed
3º Compare the files with each other. Every difference found must be, necessarily, a modification of the standard code. This comparison will generate small files that will collect these differences.
NAV Development Shell:

Compare-NAVApplicationObject -OriginalPath "c:\export2al\Originales\" -ModifiedPath "c:\export2al\Modificados\" -DeltaPath "C:\export2al\Delta\" -ExportToNewSyntax
4º Convert these differences into AL so that if they are new tables, it generates tables, if they are new fields in a standard table, it generates a TableExtension, and the same with pages. It won’t convert codeunits or reports to AL automatically; those will have to be done manually and/or generated as they are in AL (see note at the end). The delta files will be useful for codeunits to see what code is new, but subscribing to events in AL will be a manual task.
CMD de windows (Con administrador)

cd C:\Program Files (x86)\Microsoft Dynamics 365 Business Central\140\RoleTailored Client

txt2al --source="C:\export2al\Delta" --target="C:\export2al\AL" --injectDotNetAddIns --dotNetTypePrefix=BC --rename
Now, in the “AL” folder, we will have the files corresponding to the 50k objects, the pageextensions, and the tableextensions related to modifications in standard objects. Modifications to codeunits and reports of the standard will have to be done entirely manually.
We could have excluded the 50k objects from the comparison since those could be exported and converted into AL directly. (Meaning, do step 1 and 4 with those objects, filtering in step 1 by -Filter ‘Id=50000..99999’)
At this point, the most laborious and manual process comes in because:
- TableExtensions and PageExtensions may contain code changes that need to be manually performed through event subscriptions or changes in location. Some property changes in standard fields may not be feasible in AL.
- For codeunits, we will know the differences if we go to the files in the Delta folder. Using these differences, we’ll have to find the event to which we should subscribe to preserve functionality.
- Reports will be made using reportextensions, or we can duplicate them and replace the standard ones. However, their functionality needs to be verified.
- The 50k objects are a direct change and do not need to be reviewed.
So we have a lot of work ahead, but we already have generated objects on the one hand, and on the other hand, we have files indicating differences between standard code and modified code, not depending on comments from good developers.
However, we have a long way to go since all modified standard code will have to be redone by subscribing to events of standard objects. It’s good to know that, in the future, this will be the last time we have to do this task. But for now, it is not an easy task, especially with all the refactoring that has occurred throughout the application.
This migration is going to be very costly. From NAV2016 to BC14 C/AL, the migration cost is between 3 to 5 times lower than BC14 C/AL to BC14 AL in terms of time, for example. However, the cost of BC14 AL to BC22 AL is really minimal.
As a note, a migration from BC14 C/AL to BC22 requires having the extensions in BC22; they don’t need to be created twice, and there is no need to perform two data or functionality revisions. We will see this in the next post.
If I were asked to perform a migration from 2016 to BC22, for example, I would convert it to BC14 (i.e., install the database and open it with the development environment of BC14) for both my database and the Cronus of the 2016 version, with the corresponding CU. Once at that point, I would follow the previous steps, knowing that there might be some additional errors due to changes in names, especially in PageExtensions.
It could also be done with the following traditional steps, where we would get everything in C/AL to put it in BC14, and then we would start with the steps mentioned at the beginning of this post.
NAV2016 Cronus
Export-NAVApplicationObject –DatabaseServer DESKTOP-LOJLSD5\POWERBI –DatabaseName "Demo Database NAV (9-0)" –Path C:\Merge\CronusNAV16\Cronus16.txt -Filter 'Id=1..1999999999'

MiBBDD2016
Export-NAVApplicationObject –DatabaseServer DESKTOP-LOJLSD5\POWERBI –DatabaseName "miBBDD" –Path C:\Merge\MiBBDD2016\MiBBDD2016.txt -Filter 'Id=1..1999999999'

BC14Cronus (Se haria la exportación instalando BC14)
Export-NAVApplicationObject –DatabaseServer DESKTOP-LOJLSD5\POWERBI –DatabaseName "BC14Cronus" –Path C:\Merge\CronusBC14\CronusBC14.txt -Filter 'Id=1..1999999999'


NAV2016 Cronus
Split-NAVApplicationObjectFile -Source C:\Merge\CronusNAV16\Cronus16.txt -Destination C:\Merge\CronusNAV16\Splited\

MiBBDD2016
Split-NAVApplicationObjectFile -Source C:\Merge\MiBBDD2016\MiBBDD2016.txt -Destination C:\Merge\MiBBDD2016\Splited\

BC14Cronus
Split-NAVApplicationObjectFile -Source C:\Merge\CronusBC14\CronusBC14.txt -Destination C:\Merge\CronusBC14\Splited\


Generación Deltas
Compare-NAVApplicationObject -DeltaPath C:\Merge\Deltas16 -ModifiedPath C:\Merge\MiBBDD2016\Splited\ -OriginalPath C:\Merge\CronusNAV16\Splited\

Merge de todo

Merge-NAVApplicationObject -ModifiedPath C:\Merge\MiBBDD2016\Splited\ -OriginalPath C:\Merge\CronusNAV16\Splited\ -TargetPath C:\Merge\CronusBC14\Splited -ResultPath C:\Merge\Result\
The truth is, I don’t know which of the two options is better. I only used the second one, meaning comparing the three versions and then moving on to convert the objects to AL.


